The shocks on the SC10 should be rebuilt every month or so to keep them in top shape. Over time, the oil in the shocks will slowly leak and after a few weeks the oil loss will start to affect performance of the shocks. Also, rebuilding your shocks gives you a chance to try a new shock oil weight that could shave time off your laps.
We have a shock rebuild guide that walks you through taking apart your shocks, filling them up with fresh oil and getting them back on your SC10.
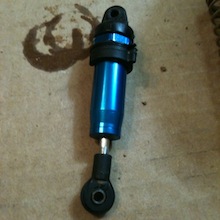
This guide walks you through changing the oil on one of your shocks. The same concept applies to the front and rear shocks.
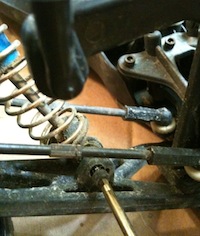
Step 1: Remove the shocks from the SC10
Step 2: Remove the springs from shock bodies
Step 3: Remove the shock caps, empty oil, and refill
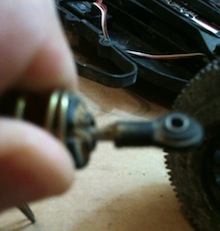
Grab 2 sets of pliers (1 pair of needle nose) to remove the shock caps. Grip the hex portion at the top of the shock body with the needle nose pliers and then grip the shock cap with the 2nd set of pliers. Then simply loosen the shock cap while being careful not to spill the shock oil (See picture to the right).
Then empty the oil into a garbage can. After emptying, slowly push the shock shaft into the shock body. A little more oil should come out when the shock shaft is fully compressed. Next, grab your shock oil of choice and fill the shock body until the oil forms a thin bubble over the rim of the shock body. Make sure the shock shaft is fully extended before filling! Screw the shock cap back on with your fingers, do not over-tighten.
For a shock oil weight, we recommend 35wt in the rear and 40wt in the front. This is for a hard clay track with 8th scale jumps.
If you are running on a 10th scale track you might want to try a lower weight oil all the way around, because you don't need to worry about bottoming-out on the jumps and the softer action will increase traction through the bumps and turns.
If you are running in the street, try a higher weight all the way around. This will give you more stability at high speeds and keep your truck from bottoming out on any jumps you set up in your driveway :)
Step 4: Bleed the Shocks
Step 5: Put the springs back on the shock and re-install the shock
Once you have bled the shocks, make sure the shock cap is tight on the shock body. Use the pliers to tighten, but be careful not to over tighten. Put your spring back on and re-install the plastic spring container on the bottom of the shaft. Then screw the shock back onto the truck.
That's it! Only 5 steps. The first time it will probably take you 5-6 minutes per shock, but with a little practice and the right tools you will be doing a 4-shock rebuild in 10-15 minutes.
Be sure to read our article about the new SC10 FT Front V2 Threaded Shocks and the SC10 FT Rear V2 Threaded Shocks
If anything in this article is unclear, please post below so I can clarify.